How Do I Generate Report Engine Source Code from Report Designer?
This article describes how to use the Generate Code feature of Report Designer to create Report Engine source code for a given report template.
You just cut and paste the generated code into your Report Engine project, then you have a Report Engine application that generates output from the report template. This is useful for rapidly prototyping and testing report templates without manually writing the code.
Supported Programming Languages
.NET Report Engine
- C#
- VB.NET
Java Report Engine
Java
Report Engine for RESTful
- C#
- Java
- PHP
- Python
- Ruby
- Typescript
- VB.NET
How It Works
Windward report templates contain attributes that need to be called with unique code from the Windward Report Engine. These include each of your data sources and any Input Parameters you’ve created:
- Data sources - These data sources have unique connection strings for SQL and file path references for XML, JSON and other file-based data sources.
- Input Parameters - You must enter each of the Input Parameters created in your template in order to use them in the Windward Engine.
To define these attributes and generate output, the Windward Report Engine has eight major steps that must be performed by your code. The Generate Code feature takes care of these steps for you:
- Initialize the Engine – This process allocates the memory and sets up the basic structure. This should be specifically tailored to your computer’s configuration.
- Open Input and Output File streams – This is the first step the Generate Code button assists you with. It will help you create the streams to the file path locations of your template (input stream) and generated output (output stream).
- Datasource Connection – This is the second step the Generate Code button assists you with. SQL data sources require a connection string with username, password, server and database. File-based data sources require a path to the data source file.
- Instantiate the report object for desired output – Depending on the output you want to generate, you will create an object using the method ReportXXXX(template, output), where XXXX is the file format you wish to create, e.g. DOCX, PDF, XLSX, etc.
- Run the Report Process – This will set up the template with the defined data sources and begin processing the Tags against each data source.
- Add Input Parameter Values - This is the third step the Generate Code button assists you with. It will help you create the code for assigning a value to the Input Parameters you defined in your template.
- Data Source Nickname Mapping – This is the fourth step the Generate Code button assists you with. If you are using more than one data source, then nicknames need to be assigned to differentiate from which data source a Tag is pulling its information. You have to map a nickname to each data source connection you defined earlier in order to successfully process them.
- Clean up – the final part of the processes closes out all file streams and releases memory back to the OS.
You don't need to run Generate Code for every template. You run this once to get started by copying the sample code to your application. You then will add to that code to pass in the template you want to run and to write the generated output to your output stream.
Over time you may find you need to add additional Input Parameters that are passed in when you generate output, or possibly even another data source. Don't re-run Generate Code in this case, just add those items to your code.
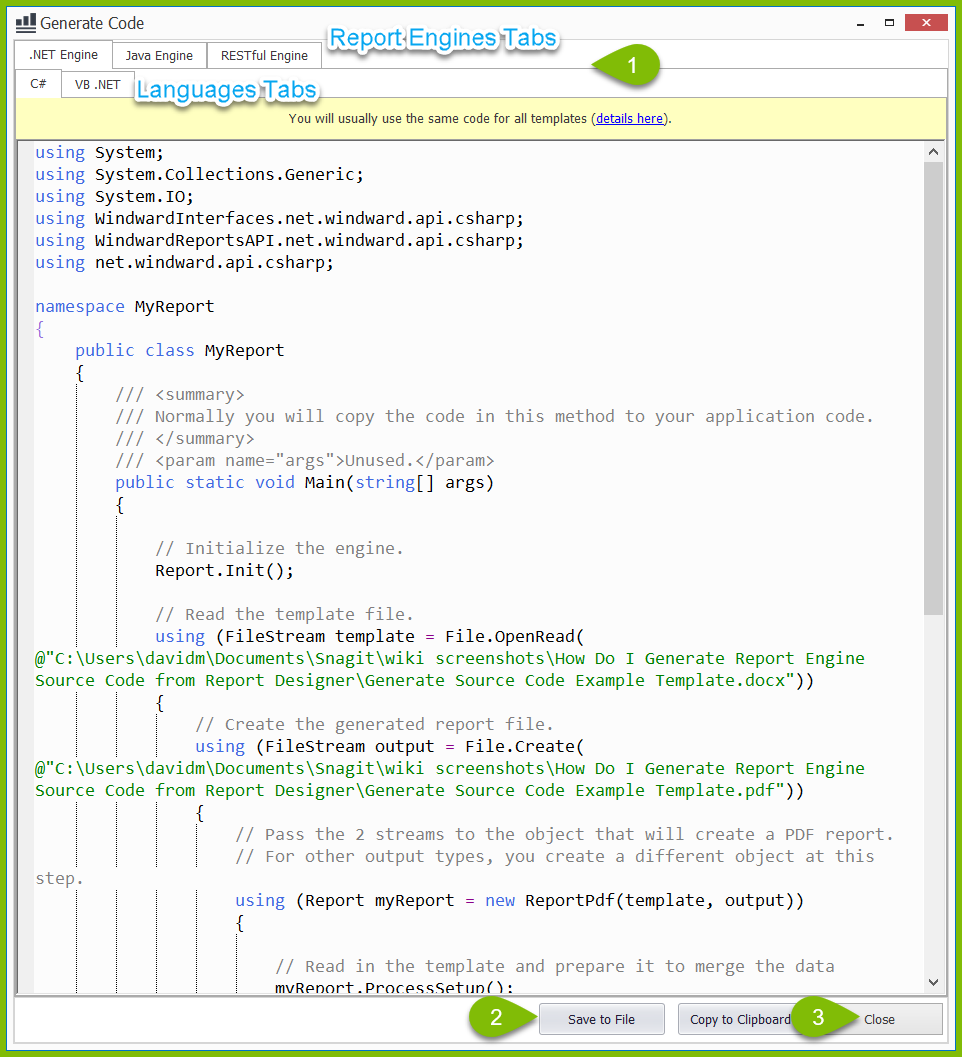
Using the Generate Code Window
Open a Tagged report template, connect to the data source(s), and click on the "Generate Code" button on the Windward Tools ribbon:

- Select your Report Engine and programming language from the tabs at the top of the Generate Code window
- Click on "Generate Code", then click on the "Save to File" or "Copy to Clipboard" button at the bottom of the window
- Click on "Close"
4. Open your project and paste the code in your main project file, save and compile.
You must add references to your project for any files it uses like templates and file-based data sources before you can compile.
0 Comments
Add your comment